
| Type: | Platform |
| Connection Method: | API |
| Link Detection | yes |
| Pricing Models: | CPA |
| Supported Events: | click, lead, conversion |
| Widget Support: | yes |
| Update Schedule | hourly |
| SubIDs (max length): | var2 (unknown), var3 (unknown) |
LinkClicky not only supports QuinStreet’s affiliate links, but also their widgets (quidgets). Currently, LinkClicky only supports QuinStreet’s credit cards. Contact LinkClicky support for support for their other niches.
Install and Enable WordPress plugin
To track widgets, you must install LinkClicky’s WordPress plugin and enable the QuinStreet option within the plugin.

Since LinkClicky installs QuinStreet’s JavaScript, you do not need to install any code, and it should be removed from your site. All that is needed is to insert your QuinStreet SRC number provided by your affiliate manager.
Creating Click Report
If you want to track clicks and conversions from QuinStreet’s widgets, you must create a custom report.
- Log in to QuinStreet’s QMP Publisher Services.
- Make sure you are in the Credit Cards section (top menu) before continuing.
- On the left menu, select Reports.
- From the submenu, select Custom Reports.
- Next, at the top right, select the Create Detailed Report button.
- For Date Type, select Click Date (not Process Date)
- Check off the following fields:
- Advertister
- Card ID
- Card Name
- Category
- Click ID
- Click Time
- Placement ID
- Primary Card Category
- Referring Session URL
- Var2
- Var3
- When done, click the Apply button at the bottom of the page.
- Next, create filters by selecting the Filter Table option at the top of the table.
- Select the field Var3 and from the drop-down list, select is not null. Then click the Apply button.
- Repeat the previous steps for the fields Var2 and Clicks.
- Next, save the report by pressing the Save button at the top of the menu.
- In the Name field, use LinkClicky Clicks as the name.
- For Who has access? Select Viewer.
- When done, select the Save button to complete.
- To determine the report ID, click on the three periods in the Take Action column for the report you just created.
- Select Download Via API.
- On that page, you will see a URL listed for the report. Record only the numerical id of the report (ie 68060.) That is your report ID to use in the API configuration below.
Example Field Selection
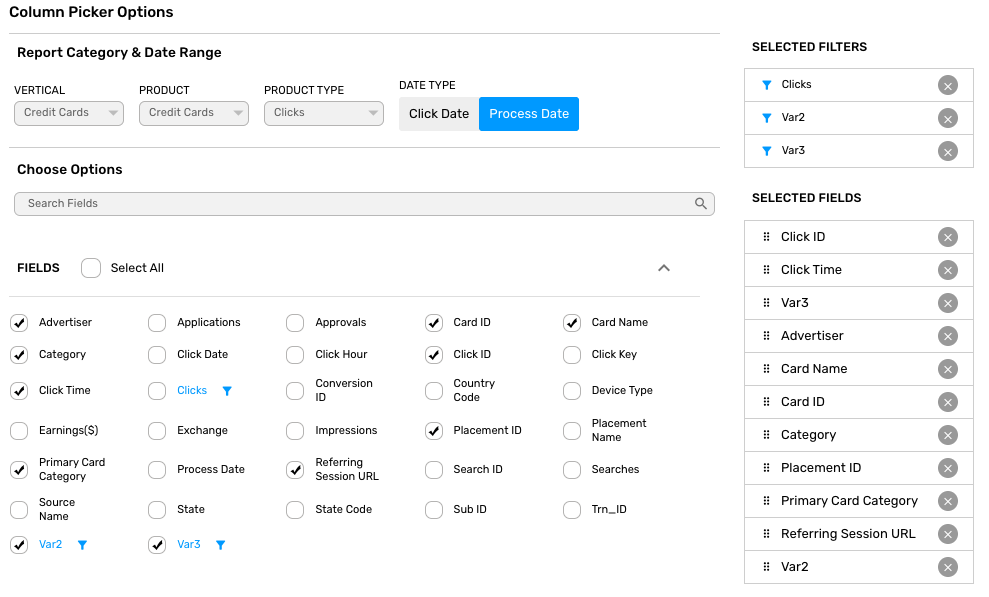
Example Filter Options

Creating Event Report
If you want to track events from QuinStreet’s links and widgets, you must create a custom report.
- Log in to QuinStreet’s QMP Publisher Services.
- Make sure you are in the Credit Cards section (top menu) before continuing.
- On the left menu, select Reports.
- From the submenu, select Custom Reports.
- Next, at the top right, select the Create Detailed Report button.
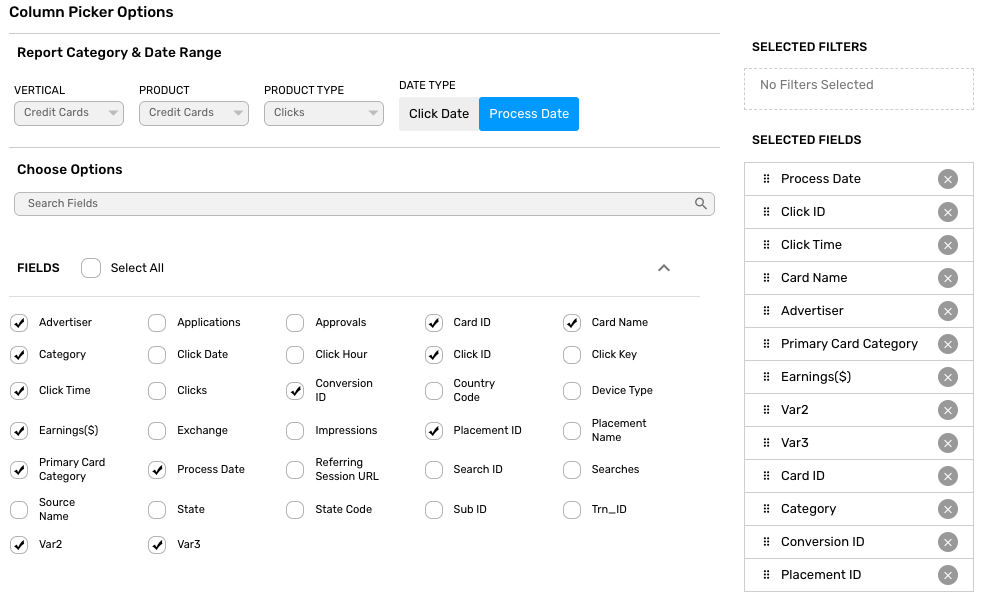
- For Date Type, select Process Date (not Click Date)
- Check off the following fields:
- Advertister
- Card ID
- Card Name
- Category
- Click ID
- Click Time
- Conversion ID
- Earnings($)
- Placement ID
- Primary Card Category
- Process Date
- Referring Session URL
- Var2
- Var3
- When done, click the Apply button at the bottom of the page.
- Next, save the report by pressing the Save button at the top of the menu.
- In the Name field, use LinkClicky Events as the name.
- For Who has access? Select Viewer.
- When done, select the Save button to complete.
- To determine the report ID, click on the three periods in the Take Action column for the report you just created.
- Select Download Via API.
- On that page, you will see a URL listed for the report. Record only the numerical id of the report (ie 68060.) That is your report id to use in the API configuration below.
Example Field Selection
LinkClicky QuinStreet API Setup
- login into your LinkClicky’s control panel.
- From the left menu, select Affiliate System under the Integrations menu.
- For QuinStreet entry, press the Edit button.
- With the information copied from above, insert the data into the JSON info listed below in the API field.
- When done, press Save.
[
  {
    "clientid": "[CLIENTID]",
    "secret": "[SECRET]",
    "clickreportid": [REPORTID],
    "eventreportid": [REPORTID],
  }
]