
While technically not part of affiliate marketing, tracking individuals on your website when using Woopra is important.
You need to tag web traffic with a visitor’s email address. With Woopra, you do this anytime a webform is submitted.
Webform submissions are a critical point in which you capture visitor information. Instead of normally just redirecting to a thank you web page, you insert the intermediate redirection page to capture PII (Personal Identifiable Information).
LinkClicky has created a feature to send PII information into Woopra via the following services:
- Calendly
- ConvertKit
- Gravity Forms
- OptimizePress
- OptinMonster
- ThriveCart (order complete)
- WebinarJam/Everwebinar
- WP Forms
- Unbounce
The script is located at: /link/woopra/id/
So if your setup is located at go.yourdomain.com and you are redirecting the thank you page to https://yourdomain.com/thank-you/ you would call the script:
https://go.yourdomain.com/link/woopra/id/?r=https://yourdomain.com/thank-you/
LinkClicky does all the rest. It will tag the existing session in Woopra and identify them with their name and email address.
This script has the added benefit of hiding PII from Google Analytics on your thank you page since that violates Google’s terms of service.
Please see the links above for setting up your specific service.
Setup in config.php
For security reasons, you must add a list of domains LinkClicky can accept. Please add it to the user/config.php configuration file. This is a one-time setup and can be skipped if already configured.
Example:
// domains from which we can submit info from
$linkclicky_accepted_domains = [
'larryludwig.com',
'members.larryludwig.com',
'welcome.larryludwig.com',
'order.larryludwig.com',
'api.larryludwig.com',
'df.larryludwig.com',
'dfl0.us',
];
Gravity Forms
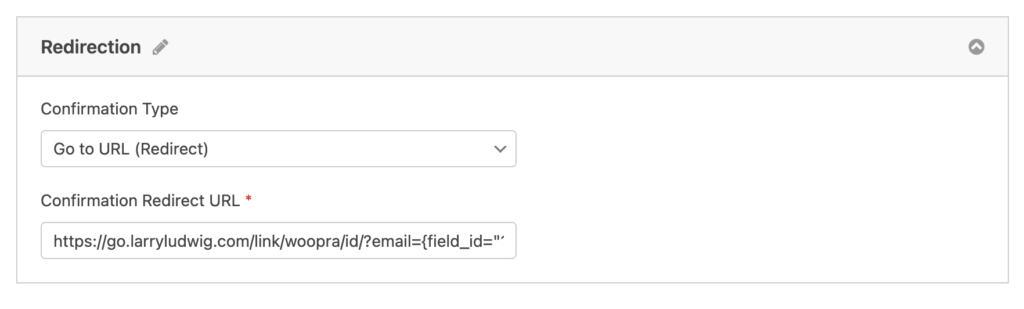
For Gravity Forms, you must create a Confirmation for your form.
Your Confirmation will look similar to this example:

The email and name field variables may differ depending on how your form was set up.
ConvertKit
Select the form within ConvertKit.
- From the Grow menu, select Landing Pages & Forms.
- Select the form you wish to modify by pressing the three-button menu and selecting Edit.
- While editing the form, select the Settings menu at the top right of the page.
- In the General tab, change from Show a success message to Redirect to an external page.
- Enter the URL below and replace
[LINKCLIKYSUBDOMAIN]and[REDIRECTIONPAGE]with your LinkClicky installation and desired thank you page. - Once done, press the Save button.
https://[LINKCLIKYSUBDOMAIN]/link/woopra/id/?r=https://[REDIRECTIONPAGE]WP Forms
For each form, you must set up a redirection confirmation.
Example:
https://go.larryludwig.com/link/woopra/id/?email={field_id="1"}&name={field_id="0"}&r=https://larryludwig.com/contact/thank-you/The field variables will depend upon your form.
OptinMonster
To enable it, you must set up the redirection for each OptinMonster campaign. When editing, select your submission button, which will display this information.
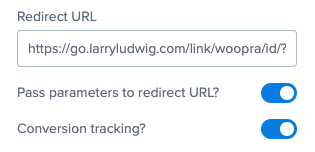
The first step is to enter the Redirect URL. An example is listed below.
https://go.larryludwig.com/link/woopra/id/?r=https://larryludwig.com/contact/thank-you/Replace with your LinkClicky installation and the URL you wish to redirect after submitting the form.
Next, pass the form parameters by enabling “Pass parameters to redirect URL?”
WebinarJam/EverWebinar
Refer to their documentation on setting up a custom thank you page within their service.
An example link to use is listed below. Please test your setup once changed.
https://[LINKCLIKYSUBDOMAIN]/link/woopra/id/?r=https://[REDIRECTIONPAGE]